This blog will focus on integrating a working Reverb WebSocket server with Flutter. We will discuss how to connect Flutter with public/private channels. Note: This blog will not cover how to set up Reverb with Laravel, as there are many resources available online for that.
How does this work?
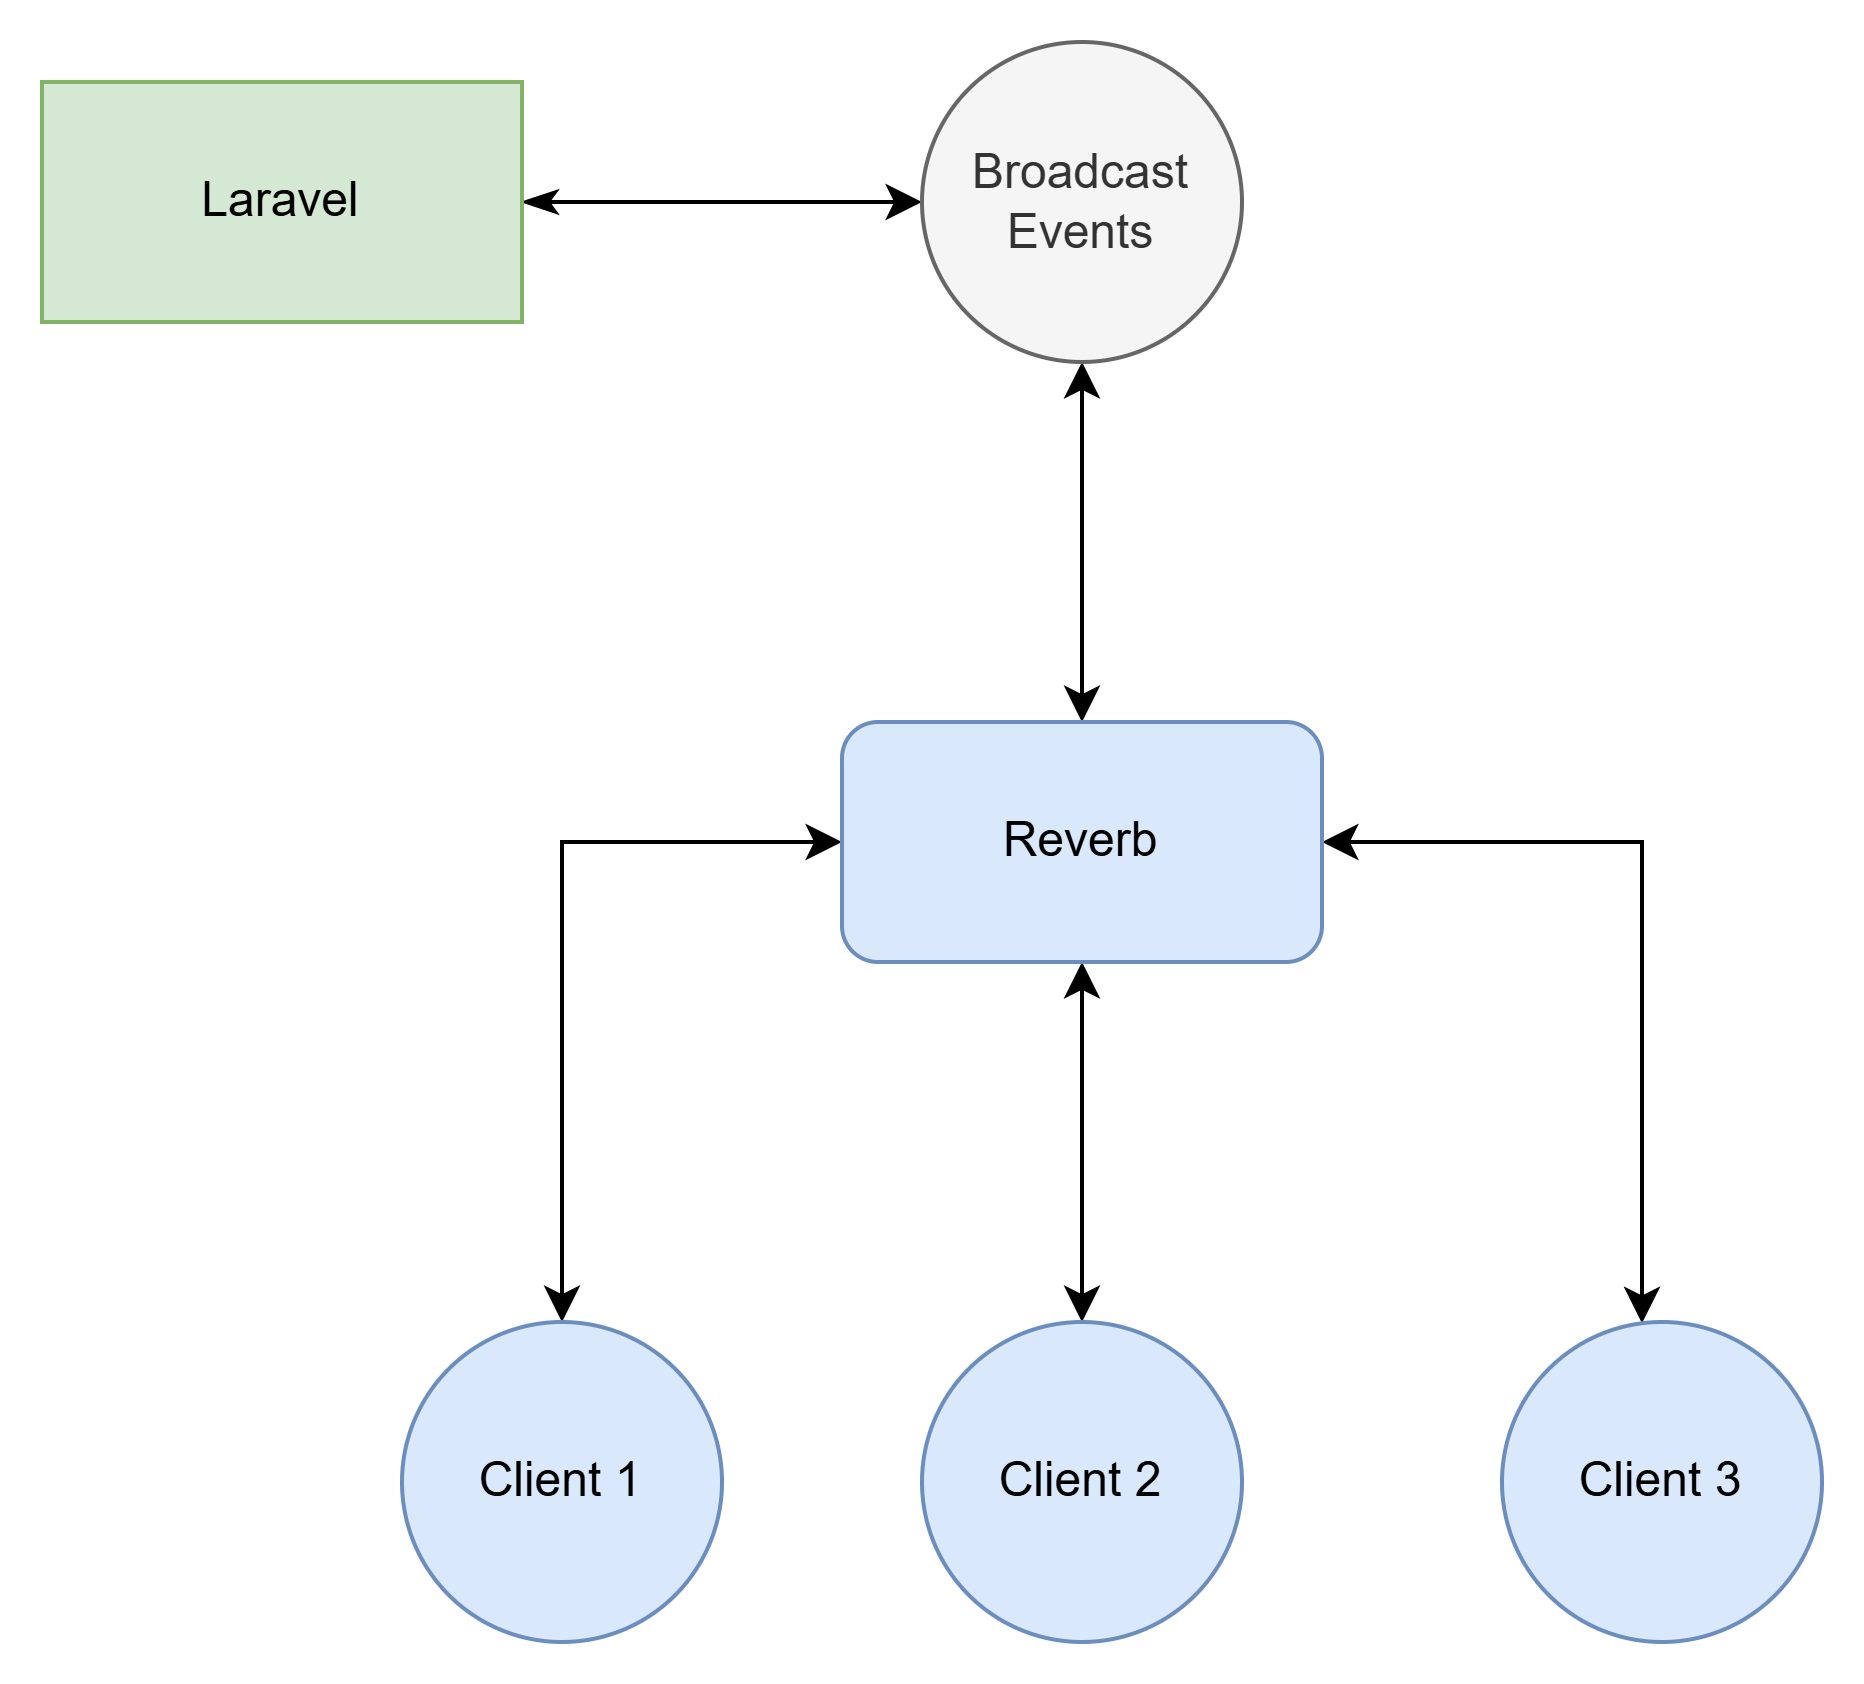
Laravel uses a feature called Broadcasting to broadcast events that include messages and channels to various drivers, in this case Laravel Reverb. Laravel Reverb then manages the actual event transmission to the connected clients.
Now, let’s dive into the main topic: how to connect all of this with Flutter. First, I will explain how to establish a connection with Reverb using Flutter. Then, I will demonstrate how to listen to both public channels and private channels.
To do all of that, we use 2 packages in Flutter
  web_socket_channel: ^3.0.2
  http: ^1.3.0
Public Channel
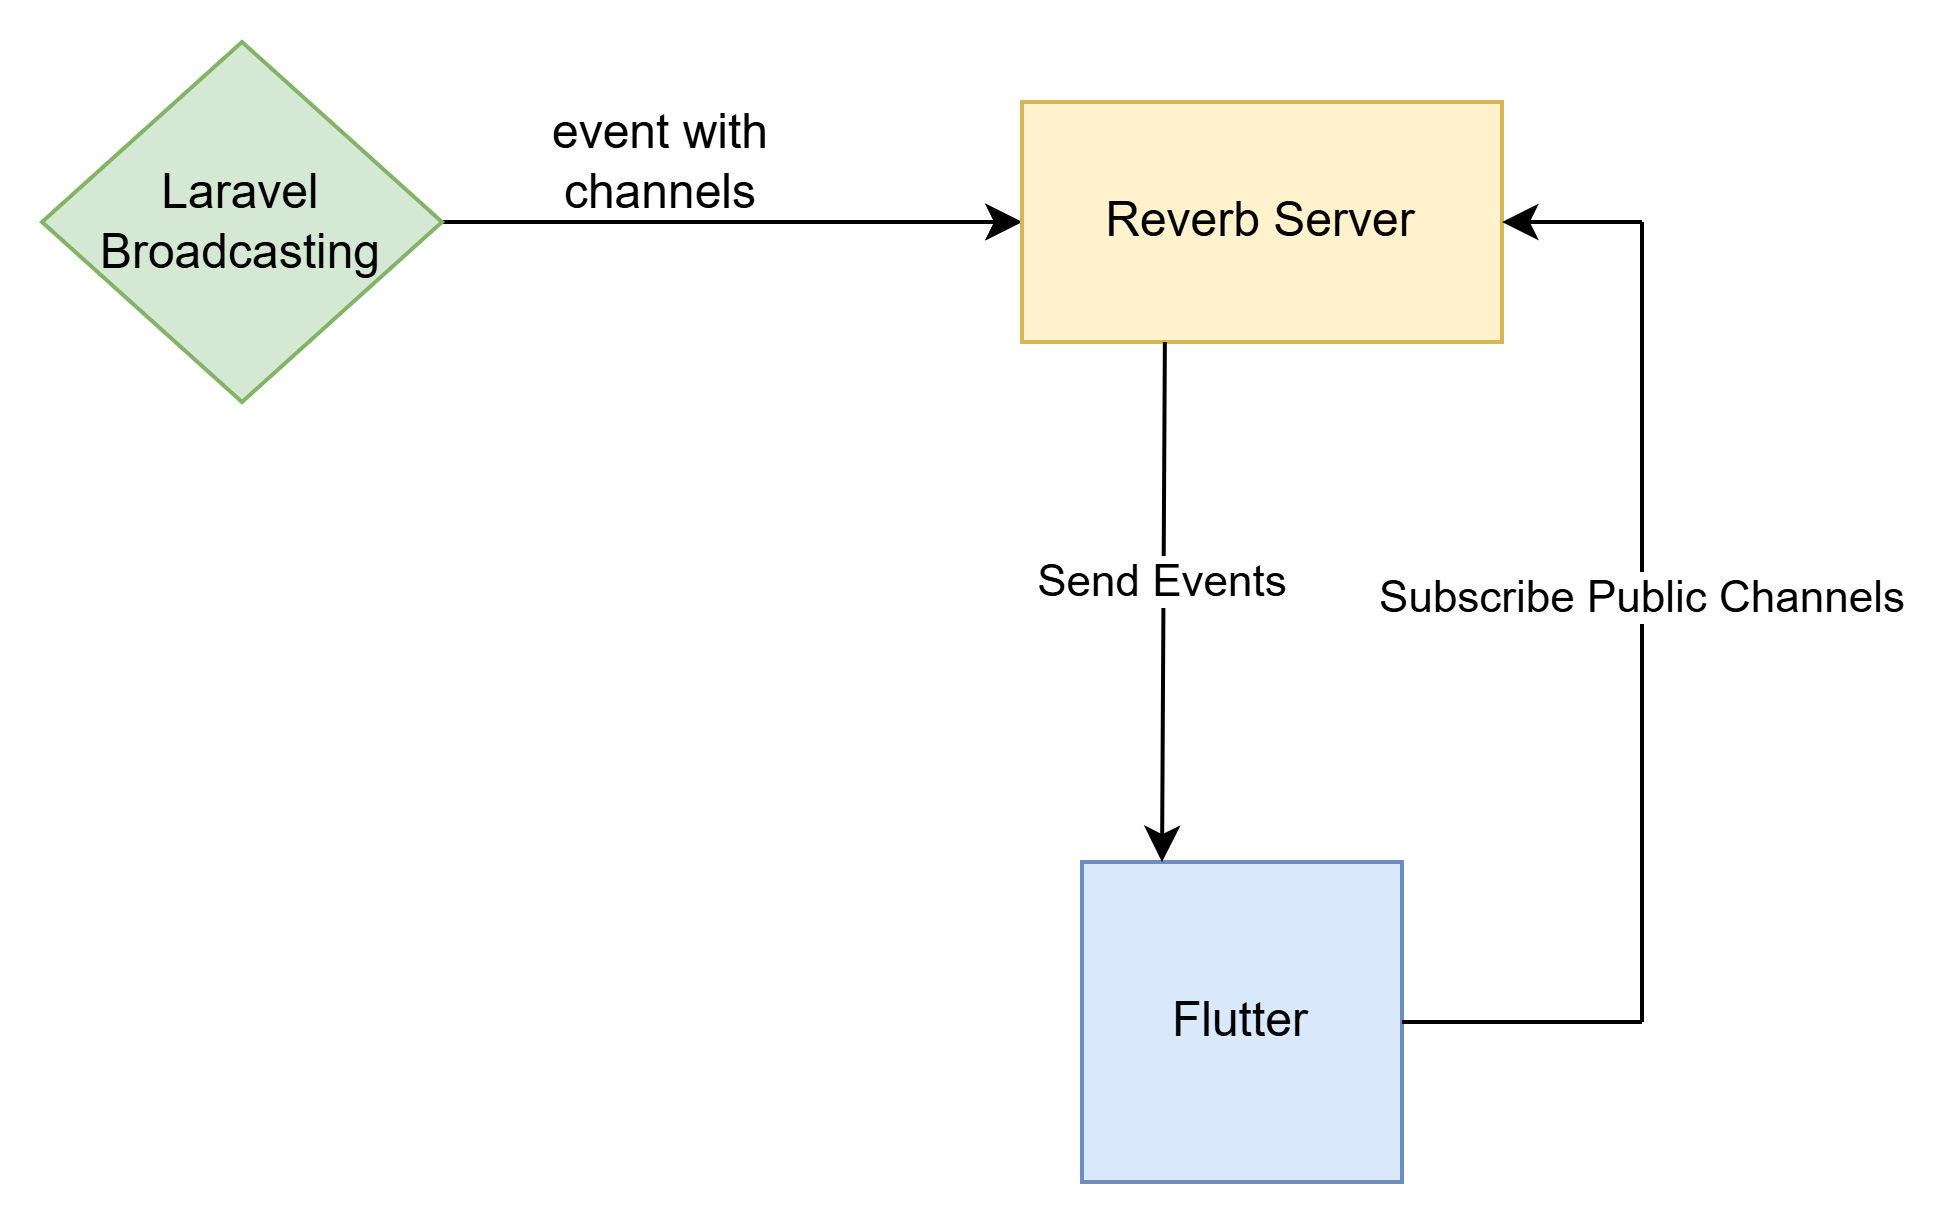
This is useful for events that you want all the users to be notify without the needs of any authorization. For example, it can be used for public notifications or alert system messages.
Let’s try a small implementation of this:
In Laravel
- Make a test event by running
php artisan make:event TestEventand config this event to broadcast to public channel
class TestEvent implements ShouldBroadcastNow
{
     ...
	public function broadcastOn()
	{
	   return [
            new Channel('test-channel')
        ];
	}
	public function broadcastWith(): array
     {
        return [
            'message' => 'Hello World'
        ];
    }
}- Add a simple route in
web.phpto send an event to the clients
Route::get('/test', function () {
    event(new \App\Events\TestEvent());
    return 'Event fired';
});
In Flutter
- Connect to the Reverb Web Socket server.
- Send a subscription request from Flutter so that Reverb knows we are listening to the public channel.
- Simply listen the messages sent from backend.
here is the full code to do that:
      final wsUrl = 'ws://$reverbHost:$reverbPort/app/$reverbAppKey';
      final channel = WebSocketChannel.connect(Uri.parse(wsUrl));
      final subscription = { "event": "pusher:subscribe", "data": { "channel": "test-channel" } };
	 channel.sink.add(jsonEncode(subscription));
	 channel.stream.listen(
	    (message) {
	      print('Received: $message');
	    },
	    onDone: () {
	      print('Connection closed.');
	    },

	    onError: (error) {
	      print('Error: $error');
	    },
	  );
Now, if you run the following command in your terminal
# change the url to your laravel url
curl http://127.0.0.1:8000/test
You will see output similar to this in Flutter debug console
I/flutter ( 4700): Received: {"event":"pusher:connection_established","data":"{\"socket_id\":\"99900295.527871421\",\"activity_timeout\":30}"}

I/flutter ( 4700): Received: {"event":"pusher_internal:subscription_succeeded","data":"{}","channel":"test-channel"}

I/flutter ( 4700): Received: {"event":"App\\Events\\TestEvent","data":"{\"message\":\"Hello World\"}","channel":"test-channel"}
Private Channel
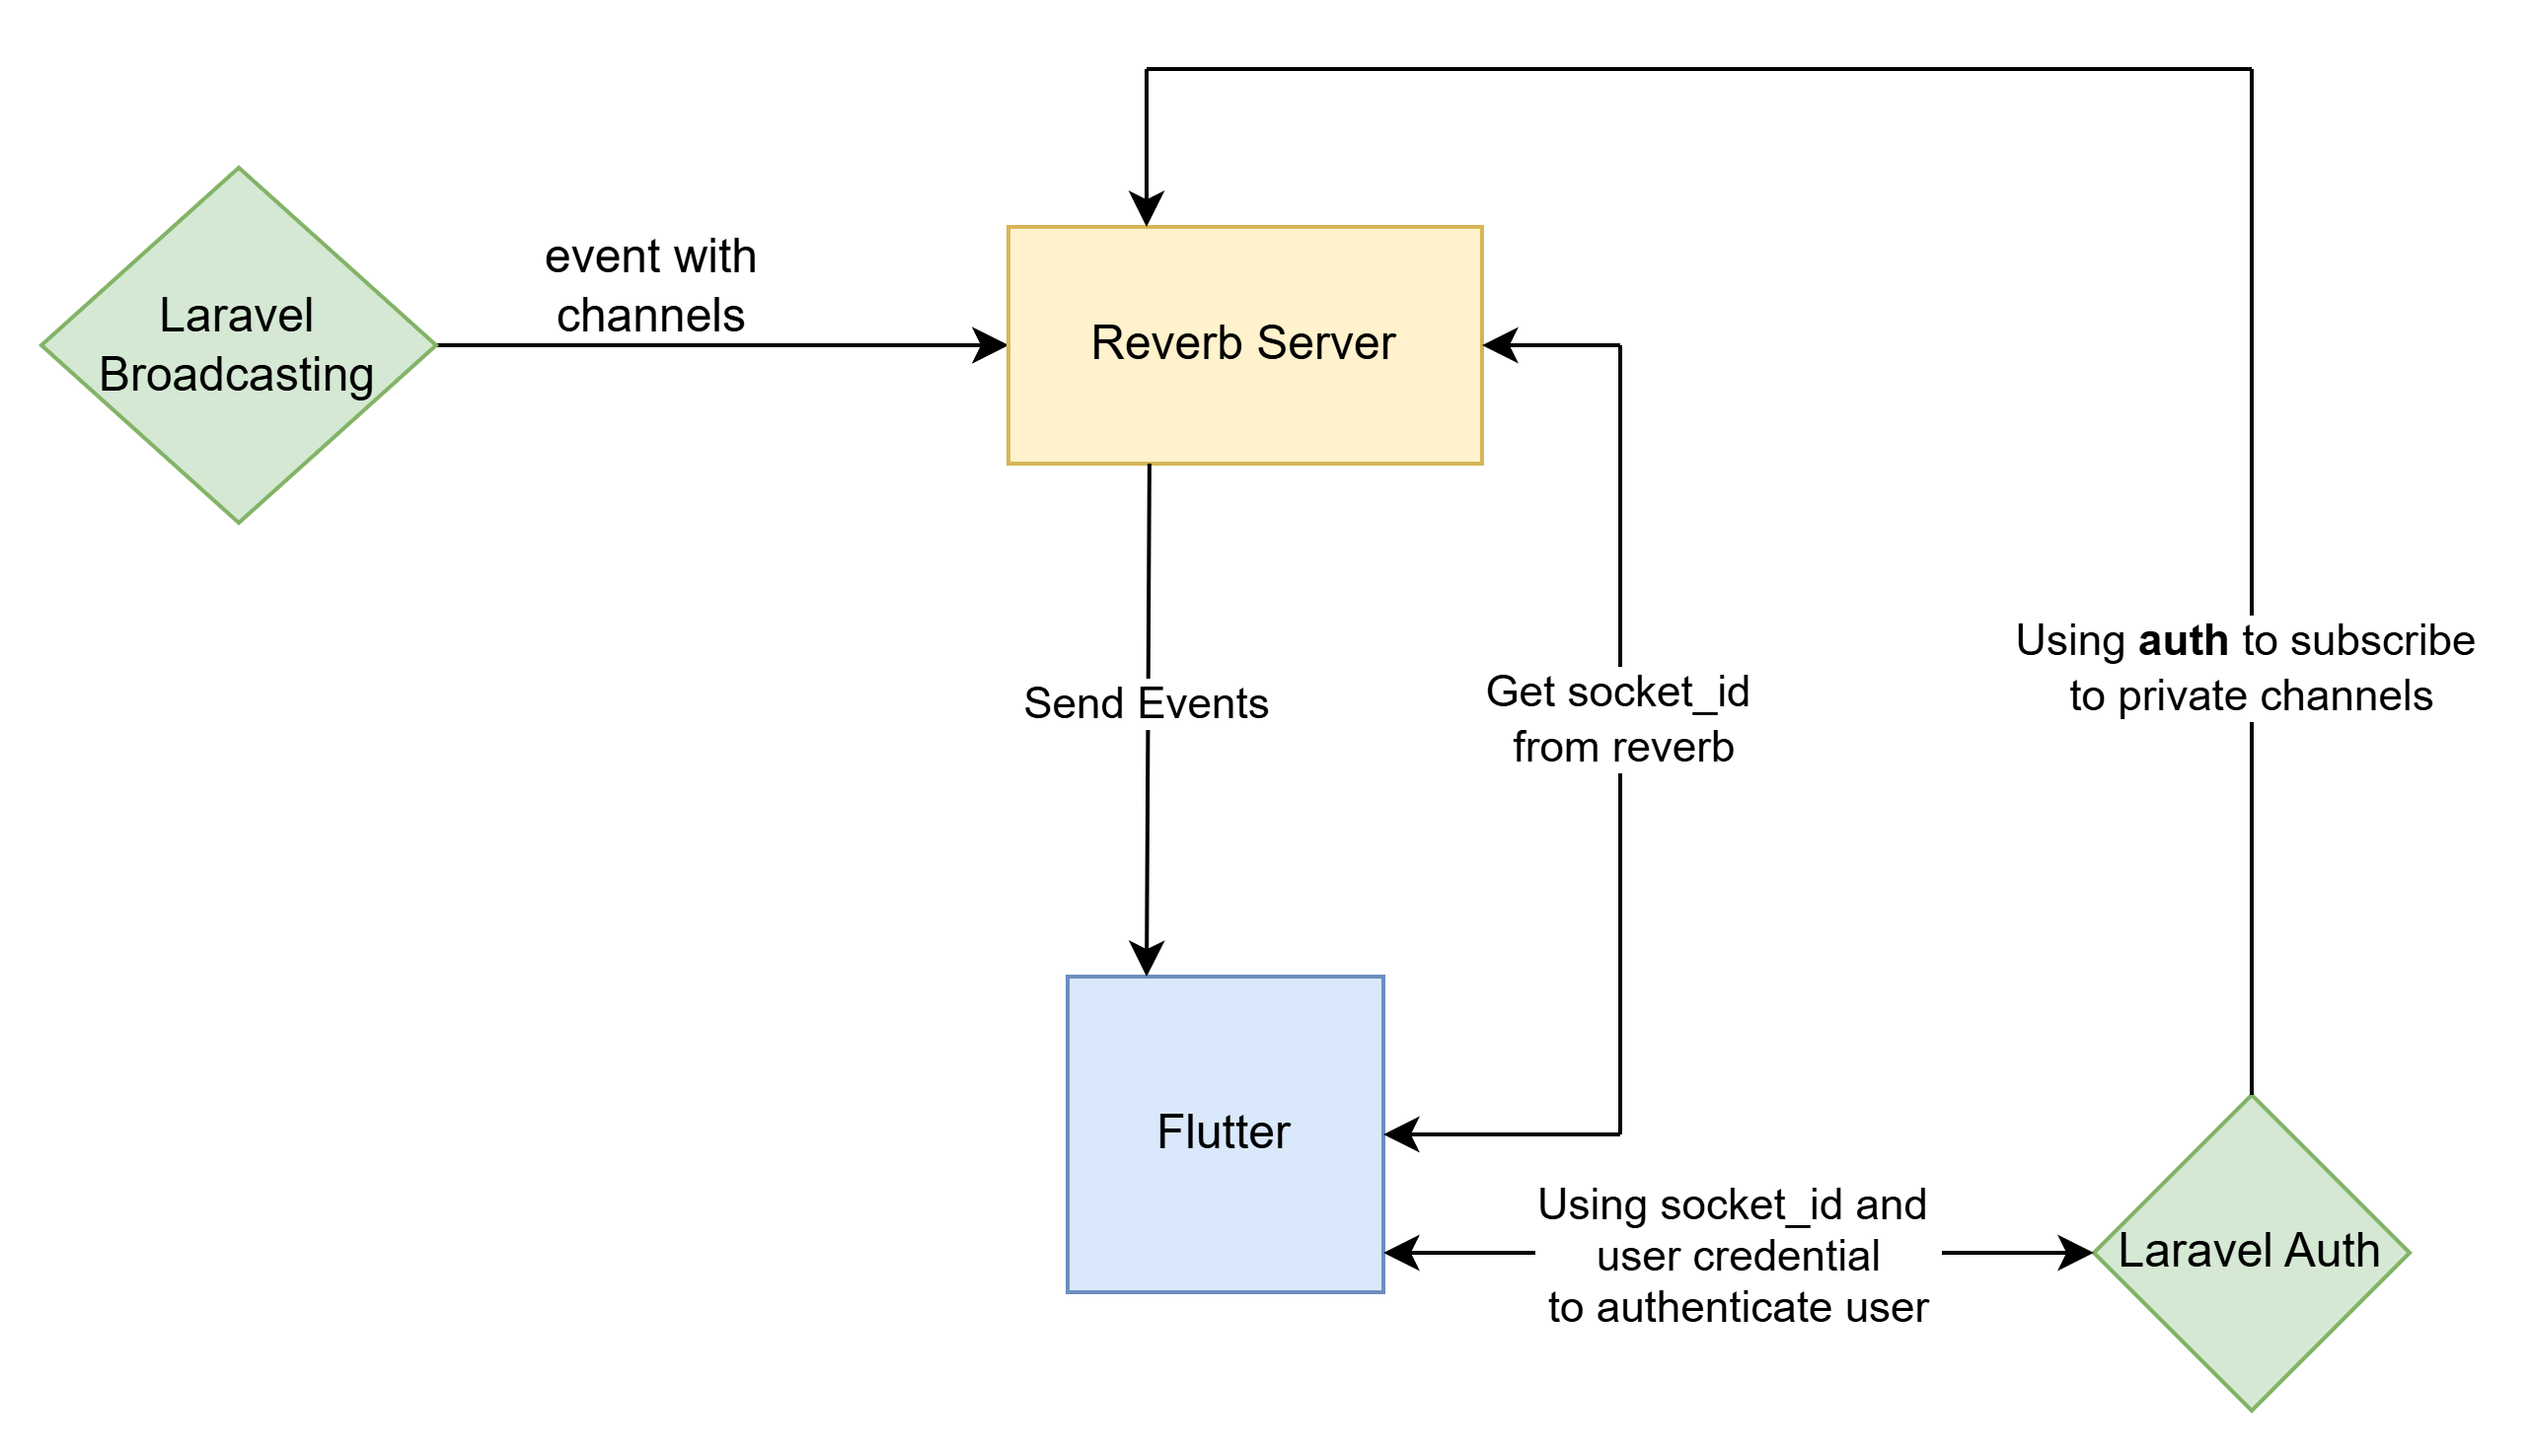
Now, onto what may be the most important topic – private channels. A private channel is essential tool for our server to communicate with clients safe and secure with the uses of authorization methods.
Let’s use the previous example to showcase this.
In Laravel
- We now define a private channel inside
channels.php. In this case, we restrict access further by allowing only one channel per user. Even if users are authenticated, they will not be able to access channels associated with a different user ID.
Broadcast::channel('test-channel.{id}', function (User $user, $id) {
    return (int) $user->id === (int) $id;
});
- Next, change the code in
TestEvent.phpto send the event through a private channel. In my case, I’ve added a static user ID because I know which user I am authenticated as. However, in a real-world use case, you would likely pass this from the constructor or useauth()->idto dynamically retrieve the authenticated user’s ID.
    public function broadcastOn(): array
    {
        $user_id = 1;
        return [
            new PrivateChannel('test-channel.' . $user_id)
        ];
    }
- Inside
BroadcastServiceProvider.php, make sure there is a middleware that handles user authentication. In our case, we use Sanctum, but you can define any middleware.Note: This step shouldn’t be necessary, but I couldn’t get Flutter to work without adding a prefix to this endpoint. Verify this by running
php artisan route:listand checking if api/broadcasting/auth exists.
    public function boot(): void
    {
        Broadcast::routes(['middleware' => ['auth:sanctum'], 'prefix' => 'api']);
        require base_path('routes/channels.php');
    }
In Flutter
We will use the same code as before, but with added functionality to perform token authentication and subscribe to private channels once we obtain the auth token from the Laravel authentication server.
void main() async {
  const userId = '1';
  const channelName = 'private-test-channel.$userId';
  const serverUrl = 'ws://$reverbHost:$reverbPort/app/$reverbAppKey';

  final channel = WebSocketChannel.connect(Uri.parse(serverUrl));

  channel.stream.listen(
    (message) async{
      print('Received message: $message');
      final data = jsonDecode(message);
      if (data['event'] == 'pusher:connection_established') {
        final connectionData = jsonDecode(data['data']);
        socketId = connectionData['socket_id'];
        authToken =  await broadcastAuthentication(socketId!,  channelName, appUrl, sanctumToken) ?? '';
        await subscribeToPrivateChannel(channelName, authToken, channel);
      }
    },
    onDone: () {
      print('Connection closed.');
    },
    onError: (error) {
      print('Error: $error');
    },
  );
}

Future<String?> broadcastAuthentication(String socketId, String channelName, String appUrl, String sanctumToken) async {
  try {
    final response = await http.post(
      Uri.parse('http://$appUrl/api/broadcasting/auth'),
      headers: {
        'Authorization': 'Bearer $sanctumToken',
        'Content-Type': 'application/x-www-form-urlencoded',
        'Accept': 'application/json',
      },
      body: Uri(queryParameters: {
        'socket_id': socketId,
        'channel_name': channelName,
      }).query,
    );
    if (response.statusCode == 200) {
      final authData = jsonDecode(response.body);
      final authToken = authData['auth'];
      return authToken;
    } else {
      throw HttpException('Authentication failed: ${response.statusCode} - ${response.body}');
    }
  } catch (e) {
    print('Authentication Error: $e');
    rethrow;
  }
}


Future<void> subscribeToPrivateChannel(String channelName, String authToken, channel) async {

  final subscriptionMessage = {
    'event': 'pusher:subscribe',
    'data': {
      'auth': authToken,
      'channel': channelName,
    }
  };
  channel?.sink.add(jsonEncode(subscriptionMessage));
  print('Subscription message sent');
}
Now, if you run the following command in your terminal
# change the url to your laravel url
curl http://127.0.0.1:8000/test
You will see output similar to this in Flutter debug console
I/flutter ( 3538): Received message: {"event":"pusher:connection_established","data":"{\"socket_id\":\"188874621.496388247\",\"activity_timeout\":30}"}

I/flutter ( 3538): Received message: {"event":"pusher_internal:subscription_succeeded","data":"{}","channel":"private-test-channel.1"}

I/flutter ( 3538): Received message: {"event":"App\\Events\\TestEvent","data":"{\"message\":\"Hello World\"}","channel":"private-test-channel.1"}
Conclusion
And that’s it. The use cases for WebSockets are virtually limitless. With this, you now have the tools to implement real-time communication in your Flutter applications using Reverb WebSockets, for interactive, responsive, and engaging user experiences.